Cars and Ribbons

Showing posts with label Valentine's. Show all posts

Monday, February 3, 2014

Valentine's Boa Tree

I loved my feather boa wreath so much, I decided to make a Valentine's "tree" using the same materials.  It was even easier to make than the wreath!

Here's what you will need:
  • Styrofoam cone (40% off coupon at Hobby Lobby)
  • Feather boa (40% off coupon at Hobby Lobby)
  • Ribbon (50% off at Hobby Lobby)
  • Heart pick ($1 for 9 picks at Dollar Tree)


Hot glue the ribbon around the cone.  I did this because my feather boa will be spaced around the cone and I did not want the styrofoam showing through.  Also, you'll notice the top of the ribbon is sticking out.  It won't show once you add the boa.


Next, wrap your boa around the tree.  I added some hot glue in various places.  I just did a spiral wrap around the cone and cut off the extra boa at the top.


Finally, I just stuck a heart pick right down the center at the top of the cone.


All done!!!  I think it took me 15 minutes max to make this.


It looks great on my buffet with my other pink decor (I made those 2 heart dishes when I was in elementary school!).  The best part was when my husband asked where I bought the tree.  He was completely surprised when I told him I was making it while talking to him on the phone during his commute home.  :)

Wednesday, January 22, 2014

Feather Boa Valentine's Wreath

It was time for a new Valentine's wreath for my door.  I wanted something simple, pretty, but festive.  So, I decided to create a wreath using a fun feather boa.

Here is what you will need:
  • Feather boa (50% off at Hobby Lobby)
  • Wreath (40% off coupon at Hobby Lobby)
  • Spool of black ribbon (50% off at Hobby Lobby)
  • Glue (I used hot glue from my own stash)


Wrap the wreath in black ribbon.  I glued as I went to keep it in place.  This won't show a lot, but it will cover up the white styrofoam.


Glue the feather boa along the top of the wreath.  I tucked the end of the boa under the bottom point and glued it.


Continue to glue the boa around the entire surface of the wreath.  Trim off the excess boa and glue the end.  You may have feathers flying around.  Hehe!


I glued a looped piece of black ribbon to the back to hang from my door.


Tada!!!  Looks pretty, festive, and was super simple!


Monday, February 13, 2012

Strawberry Fudge

I saw this yummy picture on Pinterest and decided to try it. It was so easy and very tasty. I made a batch that I passed out to friends. I'm going to make another batch for my kids teachers.


You only need only 2 basic ingredients: white chocolate chips and strawberry icing.


Melt the white chocolate chips and stir to get out all the lumps. Then, mix in the icing.


Pour into a 9 x 9 inch pan. Please ignore my very old and very stained pan! Cookiesandcups.com has more details on how to make the fudge very pretty.


Let it firm up in the refrigerator and it's ready to eat!


My variations: It was a little soft still so I stuck it in the freezer to harden even more. It's very sweet (since you're eating pure sugar!) so I may play around with the recipe. Next time I'll try less icing and/or adding a dash of vanilla extract. I also cut the fudge into squares and placed them in pretty Valentine's boxes. Remember to place a square of wax paper in between the fudge squares so they don't stick together.

Linking up here:

Wednesday, February 8, 2012

Valentine's Wreath

I enjoy making new wreaths and wanted something for Valentine's. After being inspired by the many Valentine's wreaths that I've seen, I came up with my own design. You just need a wreath, gray yarn, felt, gemstones, and hot glue. You probably already have most of these things at home.

Foam wreaths can be a little expensive. My friend Janelle gave me the best tip ever about foam wreaths. Go to Home Depot, buy the foam tubing for less than $1 and you can make any size wreath you want. Genius!!!! I cut the tube in half and that makes a really nice size wreath. That also means that each tube can make 2 wreaths!!!


To help create the circle, you can stick a wire hanger in the tube and then bend. However, I don't use hangers and still am able to make a nice circle. Just tape the ends together.


Now get a skein of gray yarn and tightly wrap it around the entire wreath. This does take some time so I caught up on my DVR shows while wrapping the wreath. Hot glue the end of the yarn to the back of the wreath.


I decided to add 3 felt flowers to the wreath in different colors: pink, white, and red. Actually, after I got the yarn wrapped, I just couldn't decide what I wanted to add to it. After trying different things, I finally decided on the flowers. Plus, I didn't have to go buy anything new for it.
I first learned how to make felt flowers from my friend Samantha's blog, Crafty Texas Girls. I've made them into pins and hair accesories and knew they would look perfect on the wreath. I made just a slight variation on these flowers and used 4 circles per flower. I just traced around a jar that was the size I wanted.


The circles don't have to be exactly perfect because you will fold them and won't notice the unevenness.


Fold each circle in half, then fold in half again. I like to add a dab of hot glue just inside the point to keep the 'petals' closed.


Glue the four petals on the wreath, making sure all the points were in the center of the flower. I added a red gemstone to the middle of each flower.


Cut a small piece of ribbon or yarn and glue to the back of the wreath to hang the wreath.


Hang the wreath and admire your work!


Linking up here:


Monday, February 6, 2012

Hanging Hearts

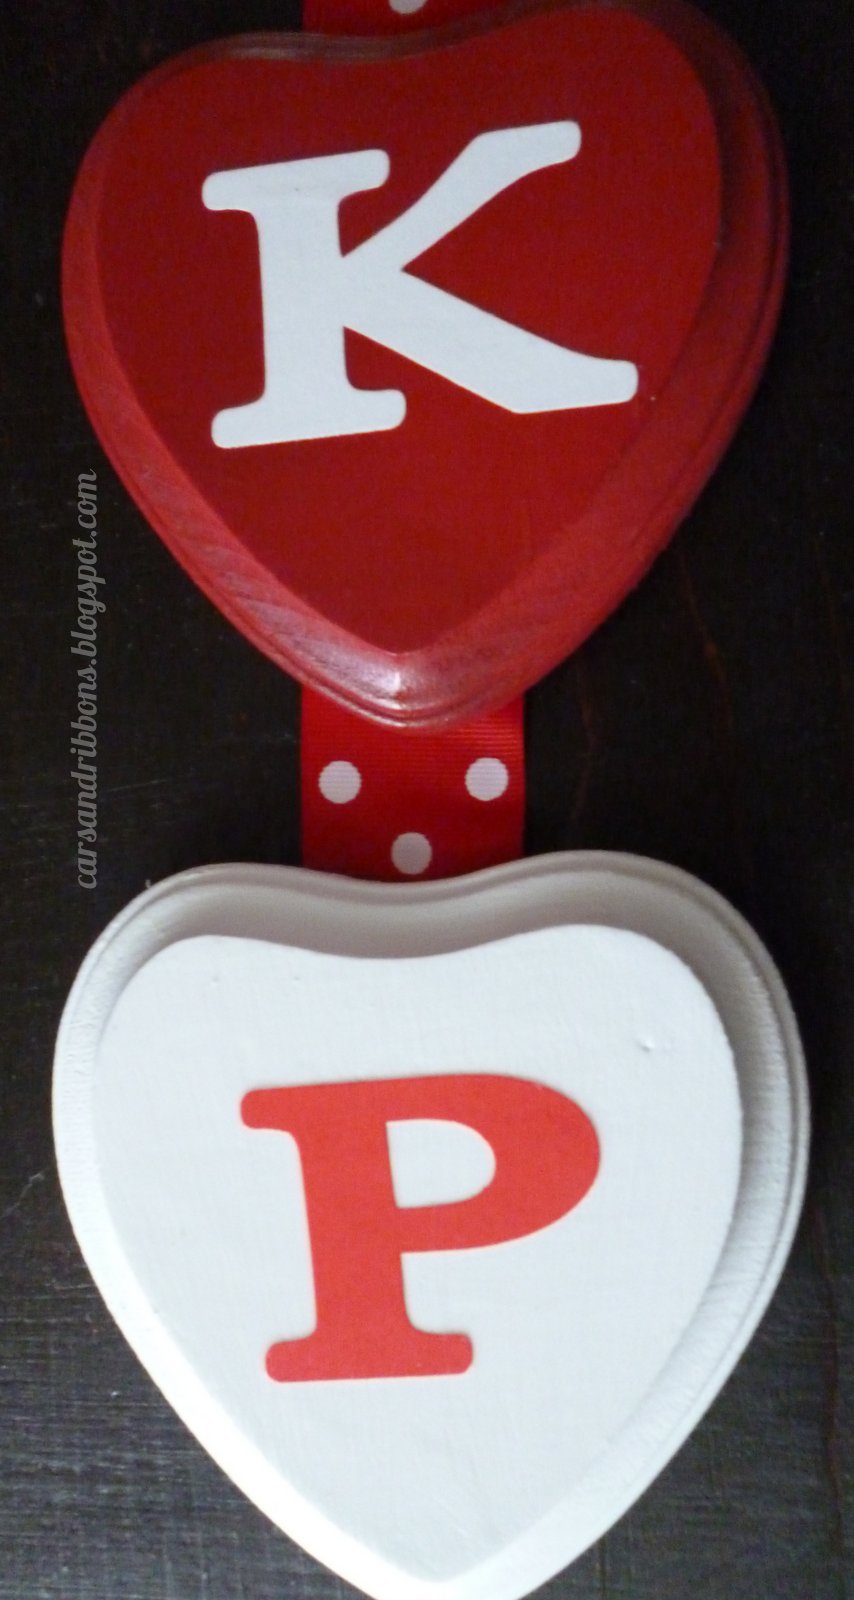
I saw these super cute hearts on Pinterest. I knew it would be so easy to make and I just made a couple variations.


First, I bought 4 wooden hearts for $.99 at Michael's and painted them. I chose just red and white because that flows better with our house. Then, I used my Cricut machine and cut out our initials. I simply Mod Podged them onto the hearts.


I got some coordinating ribbon...


...and hot glued the ribbon to the back of the hearts.


I tied a bow and glued the ends to the top heart. That's it! It was so easy, but took some time. The time consuming part was letting the paint dry and then letting the Mod Podge dry. But I love the way it looks in my house and now I have a new piece of Valentine's decor.


Linking at Debbiedoo's.

Wednesday, February 1, 2012

Valentine's Decor

About a week ago I asked my hubby to get out my tote with my Valentine's decor. The same plastic tote also contains my Easter and Fourth of July decorations. When I finally got all my Valentine's decorations out I realized I only had 3 decorations. Three?!?! Immediately I got on Pinterest and found some cute and simple ideas that I'll be making this weekend. For now, I'll show you what I do have.


This is my formal dining table. I used the same white tablecloth I use during Christmas. The 3 red hurricane vases are also used at Christmas. I love the red on the white.

These dishes were given to us from my parents on our 10 year anniversary a couple years ago. I'm thinking of changing the gold chargers to red chargers. What do you think?


Of course, the Valentine's mobile is my favorite because it was made last year by my son and daughter. We found the hearts online, printed them on cardstock, cut and glue to yarn.


I found this wooden sign years ago at Hobby Lobby. Just a fun decoration.


I don't even remember where I got this sign, but I liked that it was two-sided.


Those are my few, simple decorations. I really want to add to the decor, but not go crazy. What does your house look like for the upcoming holiday?